I stumbled across the Craftsy website which has loads of amazing online courses. I’ve taken quite a few courses since then and found many of them to be extremely helpful and informative. Recently I ‘enrolled’ in the ‘Scrapbooking with Style: Clean & Simple Layouts with Kelly Purkey’.
For those that don’t know, Kelly Purkey has been in the industry for ages. She started scrapbooking in high school about 15 years ago. Her scrapbooks are about travel, food & friends. She started as a product designer for American Crafts about 7 years ago and has since then designed for many other companies. This includes my favourite, ‘Basic Grey’, where she has designed the ‘Mon Ami’ range and the ‘Second City’ range.
In this course Kelly Purkey uses the Basic Grey Grand Bazaar range which I was lucky enough to get in my Basic Grey Mystery Box. Kelly Purkey introduces herself in the first portion of the course and states that she will teach ‘creative scrapbooking techniques’, ‘explore design principles’ and ‘show insider tips to creating engaging pages’. All of these boasts I believe she holds true.
I had been scrapbooking for quite a while before taking this course, but I was surprised by how many new techniques I learned so that I feel I got more than my money’s worth. There are seven lessons to the course covering seven layouts. Each layout she teaches more techniques.
The first lesson she calls ‘Tasty & Alder’ after a restaurant she favours and is the subject of the first layout where she teaches foundation techniques.

Basic Grey Grand Bazaar Persia Pattern Paper
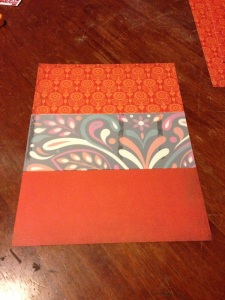
To begin with I cut the Basic Grey Grand Bazaar Persia Pattern Paper, which is 12″, down to 8 & 1/2″ by 11″.

Basic Grey Grand Bazaar Byzantine Pattern Paper in bottom third of layout.
Kelly Purkey explains a fundamental design principle and gives more tips for design and balancing layouts. I cut strip of Byzantine Pattern paper and adhered to the bottom of the layout.

Basic Grey Grand Bazaar Hagia Sophia Pattern Paper in middle third of layout.
I cut a strip of Hagia Sophia and adhered it to the middle. Kelly Purkey gives a little insight to colour theory in the video.
Vellum stuck down on top of Basic Grey Grand Bazaar Hagia Sophia Pattern Paper to mute the vibrant tones.
I cut a strip of vellum and adhere it to the page on top of the Hagia Sophia pattern paper.

Strip of Basic Grey Grand Bazaar Persia Pattern Paper to cover gap.
There was a gap between the vellum which showed the vibrant Hagia Sophia paper and it just didn’t look as polished between the Hagia Sophia and the Byzantine pattern papers, so I added a strip of Persia to tie it all together.

Heidi Swapp Stamp & Die Set – Arrows with Memento Dew Drop Ink Potters Clay & Tangelo
Kelly Purkey was using different ink, but I used what I had. At first I couldn’t decide between the brownish orange of the Memento Potter’s Clay and the cheese puff orange of the Memento Tangelo. So I stamped the arrows from the Heidi Swapp Stamp Set twice.
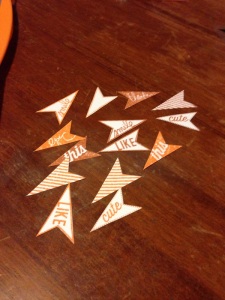
Heidi Swapp Stamp & Die Set – Arrows
I didn’t use the die even though I had it. I cut them out by hand as Kelly Purkey does in the video. It also means I don’t get the white border around the arrows leaving them all crisp. I like that Kelly Purkey explains that you don’t need exactly the same materials as her as the lesson is mostly about teaching techniques. For example if you can’t track down a set of the Heidi Swapp arrow stamps then another stamp set could be used or you could draw things and cut them out to use as staggered display at the top of the page.

Strip of Basic Grey Grand Bazaar Mediterranean Pattern Paper to cover glue mark on vellum.
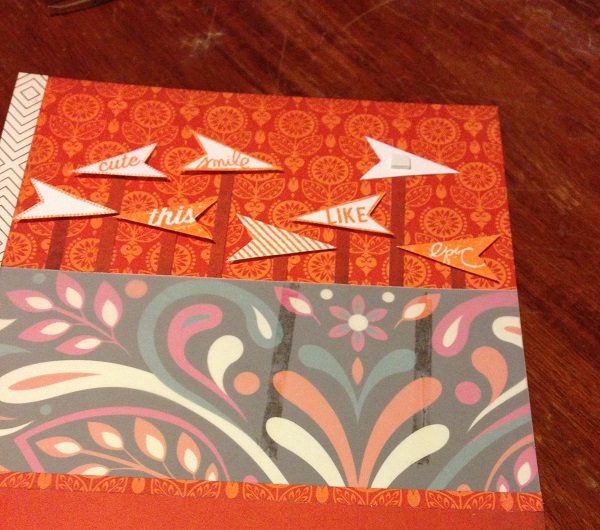
I cut a thin strip of Mediterranean pattern paper to border the left-hand side as well as cover one of the glue marks that shows through on the vellum. In the photo above I’m trying to arrange the arrows and their flag poles into a position I’m happy with.

Heidi Swapp Stamp & Die Set – Arrows adhered with foam squares.
Then once I’m happy, I adhere the flagpoles with my tape gun. I use the Scotch Advanced Tape Glider, which I invested in after seeing Kelly Purkey use it in this course. And as she says, it is so economical, easy to use etc. I love it!

Heidi Swapp Stamp & Die Set – Arrows arranged on flagpoles made with strips of Basic Grey Grand Bazaar Byzantine Pattern Paper.
I love the title of this course, ‘clean and simple layouts’. That’s exactly what Kelly Purkey teaches. All the layouts are so crisp and finished. Without her guidance, I am such a messy scrapbooker. So I was really happy to learn all the design principals Kelly Purkey had to offer.
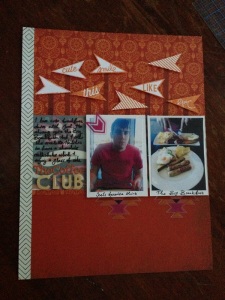
Craftsy Course Simple Scrapbooking Layouts with Kelly Purkey Project 1
So this is the finished project. I went with a similar theme of the favourite food place and I titled the page ‘The Coffee Club’ as my boyfriend and I frequent The Coffee Club. I’m very happy with the final result! I did skip quite a few steps between photos and that was mostly because when I was working on the page, my boyfriend distracted me 😉