Christmas 2015 – Christmas Card Making – Lawn Fawn Cute Bunny Merry Christmas Card Idea with Snowflakes

Lawn-Fawn-Cute-Christmas-Card-Idea-Merry-Snowflake-Bunny-Rabbit-Snow-Critters-Stamp-Die-Cut-Kawaii-Bow

This card is super kawaii, which is fantastic because I’ve posted this card off to Japan!

I made this card for one of my Japanese friends, so I put extra effort into make this one cute (or kawaii). Using the adorable bunny pattern paper from the Lawn Fawn Snow Day 6×6 paper pad, I adhered that directly to some card stock.

Then using plain white card stock, I created a scalloped border using the Fiskars scallop border punch. I adhered this strip to the bottom center of the car using foam squares after wrapping some candy red and white striped twine around the bottom and tying a bow. It was a two person operation to get that cord and bow on there so pretty! I had my friend help by holding the paper and the strands straight while I fumbled with the bow! Haha!Lawn-Fawn-Cute-Christmas-Card-Idea-Merry-Snowflake-Bunny-Rabbit-Snow-Critters-Stamp-Die-Cut-Kawaii-Bow

After stamping the sentiment using “Merry” & “Christmas” from the Simon Says Stamp Christmas Sentiments set in Tim Holtz red inks, I found I had smudged a bit of red on top of the page. At first I wanted to try and cover it up using the bunny I had stamped with Memento Tuxedo Black Ink from the Lawn Fawn Arctic Critters stamp set, but I didn’t like the look of the bunny in that position. So I placed the bunny over the CH of the “Christmas”.


Lawn-Fawn-Cute-Christmas-Card-Idea-Merry-Snowflake-Bunny-Rabbit-Snow-Critters-Stamp-Die-Cut-Kawaii-Bow

Instead to cover up my boo-boo, I stamped some snowflakes, also using the Lawn Fawn Arctic Critters stamp set, die cut them out and then adhered them over the marks using foam squares. And I’m pleased with the final results! I hope she likes it and get at least as much enjoyment as I got from making the card.

Christmas 2015 – Christmas Card Making – Lawn Fawn Cute Walrus Arctic Critter Stamp Merry Christmas Card Idea with Snowflakes

Lawn-Fawn-Cute-Adorable-Christmas-Card-Idea-Easy-Sparkly-Glitter-Arctic-Critters-Stamp-Snow-Day-Paper

This card is by far my favourite so far of all the Christmas cards I’ve made this season. I made this card for my younger brother. IT IS SO GOSH DARN KAWAII!!!

Lawn-Fawn-Cute-Adorable-Christmas-Card-Idea-Easy-Sparkly-Glitter-Arctic-Critters-Stamp-Snow-Day-Paper

That Walrus! (o^_____^o) Hahaha!

I made this card using similar techniques to the owl card in a previous post. I used the Darice embossing card to emboss some white card stock with a snowflake pattern.

And then using scraps left over from the Lawn Fawn Snow Day 6×6 paper pad, I arranged some strips in the bottom centre of the card horizontally.

I stamped the walrus and his adorable hat from the Lawn Fawn Arctic Critters stamp set onto white card stock in Memento Tuxedo Black Ink and then die cut him and his hat out using the matching Lawn Fawn Arctic Critters die cuts in the Sizzix Big Shot.

I coloured him in using Derwent Studio Pencils. The colours of the hat were picked to match the colours in the Lawn Fawn Snow Day pattern paper. I then adhered him flat to the horizontal pattern paper strips.

Lawn-Fawn-Cute-Adorable-Christmas-Card-Idea-Easy-Sparkly-Glitter-Arctic-Critters-Stamp-Snow-Day-Paper

 I used another cut out of the “Merry and Bright” pattern paper, a design also from the the owl card, and adhered that as my sentiment with foam squares.

Christmas 2015 – Christmas Card Making – Lawn Fawn Cute Owl Merry Christmas Card Idea with Snowflakes


Lawn-Fawn-Snow-Day-Cute-Adorable-Kawaii-Card-Idea-Easy-Simple-Owl-Critters-Arctic-Stamp-Die-Cut-Merry

This card I made by first embossing some plain white card stock using snowflake pattern embossing sheet from Darice. Then using some strips of scrap pattern paper from the Lawn Fawn Snow Day 6×6 paper pad, I cut one straight strip, which is the white pattern with holly berries and the green pattern with snowflakes and then I cut one using the Fiskers scallop edge punch.

Lawn-Fawn-Snow-Day-Cute-Adorable-Kawaii-Card-Idea-Easy-Simple-Owl-Critters-Arctic-Stamp-Die-Cut-Merry

I adhered the scalloped edge first with foam squares and then the straight edge on top of the scallop also with foam squares. I wanted double wammy pop out effect! I stamped the owl and the hat using the Lawn Fawn Arctic Critters stamp set and Memento Tuxedo Black Ink. I die cut the owl and hat out using the matching Lawn Fawn Arctic Critters dies set and the Sizzix Big Shot.

I coloured in the owl brownish, I wanted to try something new and I haven’t coloured in one of the owl stamps brown before and I really like the way it turned out. Adorable little tawny owl! I also coloured in the hat using colours matching the Lawn Fawn Snow Day pattern paper. I used Derwent Studio Pencils.

Lawn-Fawn-Snow-Day-Cute-Adorable-Kawaii-Card-Idea-Easy-Simple-Owl-Critters-Arctic-Stamp-Die-Cut-Merry

And to finish it all off, I put a couple clusters of red rhinestones and I fussy cut out “Merry and Bright” from a Lawn Fawn Snow Day pattern paper scrap. I’m really happy with this card!

Christmas 2015 – Christmas Card Making – Lawn Fawn Snow Day Paper & Simon Says Stamp Happy Holidays Card Idea

Happy-Holidays-Simon-Says-Stamp-Christmas-Card-Lawn-Fawn-Snow-Day-Easy-Simple-Card-Design-Idea-Red-Green

This card I made for my partner’s family. It’s very simple in design and construction, was easy to put together and used up some scraps.

Happy-Holidays-Simon-Says-Stamp-Christmas-Card-Lawn-Fawn-Snow-Day-Easy-Simple-Card-Design-Idea-Red-Green

I adhered to the lower section of the the card a strip of green pattern paper that has a Christmas tree repeating pattern in a lighter green. I wrapped some red & white twine or cord around this banner and tied a bow. The twine is also from the Lawn Fawn collection. I’ve used this twine a lot and I still have heaps left, so I can definitely recommend buying some of the Lawn Fawn twine as you’ll get quite a lot of use out of it and it’s a great embellishment. They come in heaps of different colours too, I also have a pink and white roll.

Happy-Holidays-Simon-Says-Stamp-Christmas-Card-Lawn-Fawn-Snow-Day-Easy-Simple-Card-Design-Idea-Red-Green

I used the Simon Says Stamp Happy Holidays stamp set and stamped the sentiment in red using Memento ink and the trees in green using Tim Holtz Distress ink. I fussy cut the trees out from the white card stock and then stuck them onto a square of white card stock. Then I stuck that white card stock to some green pattern paper from the Lawn Fawn Snow Day collection and I adhered this to the top section of the card using foam squares. I finished off the card by adding three red rhinestones to the sentiment.

Christmas 2015 – Christmas Card Making – Lawn Fawn Cute Card Simple Card Idea Snow Day Paper Merry & Bright

Lawn-Fawn-Snow-Day-Pattern-Paper-Christmas-Card-Idea-Merry-Bright-Owl-Stamp-Cute-Simple


Together with my bestie, Yvette, we made some cute cards together. With this card we wanted to use the owl stamp from the Lawn Fawn Arctic Critters Stamp Set and also wanted to do some layering and use up some scrap pieces of paper also from Lawn Fawn. The pattern paper is from the Snow Day Collections.

It is a nice and simple card to construct. We only coloured the beak of the owl orange and the hat that is included with the Arctic Critters Stamp Set we stamped and coloured separately and then adhered it to the owl’s forehead. We placed the green pattern paper down flat then used foam squares on the white pattern paper for the second layer. And to really have this card pop out we used more foam squares on the red pattern paper. We aligned all the rectangle scraps (green, white & red) askew, until we had them in a position that we enjoyed and then we adhered the owl and the sentiment “Merry & Bright”, that was cut from the journalling cards in the Snow Day papers, flat to the red snowflake pattern paper.

It’s a very cute card and was fun and quick to make.


Christmas 2014 – Lawn Fawn Snow Day Shaker Card

This card I made for a friend that lives in Japan. I wanted to do a shaker card for her. I measured sheet of red paper with a snowflake pattern to fit within the dimensions of the card and then I cut out a window from that using the Lawn Fawn Large Rectangles Stitched Stackables. This paper is from the Lawn Fawn Snow Day 6×6 paper pack.

Lawn-Fawn-Stackables-Die

From there I measured out background which I thought the pattern paper with the cute bunnies in the snow would be perfect. This is also from the same Lawn Fawn Snow Day paper pack.

Lawn-Fawn-Christmas-Papers

Lawn-Fawn-Snow-Day

Once I had the background measured and cut out I adhered it to the card.

Lawn-Fawn-Christmas-Card

I double checked the pattern papers aligned nicely and there was nothing sticking out from behind the red pattern paper.

Lawn-Fawn-Snow-Day-Idea

Then I cut a strip of white card stock and cut a triangle form one end to make a ribbon banner.

Lawn-Fawn-Merry-Christmas

I stamped ‘Merry’ in red and ‘Christmas’ in black from the Simon Says Stamp Holiday Greetings stamp pack. I adhered the ribbon to the pattern paper.

Stickles-Christmas-Red-Idea

I wanted to jazz it up a bit so I used Christmas Red Stickles to go over the ‘Merry’ sentiment and I added a few accents on the red portions of the pattern paper, such as the heart the bunny is holding and Christmas bauble hanging in the tree.

Lawn-Fawn-Snow-Day-Card

It took ages to dry! But once the stickles was all set, I put poured some sequins into the centre.

How-to-make-a-shaker-card

I cut some clear plastic wrap, from a scrap packet that had contained embellishments, to fit the ‘window’. And then I lined it with foam tape. It took a while to peel all the strips off, haha! But once I had, I adhered it on top of the background and the shaker card was all done! Shake, shake, shake!

Lawn-Fawn-Snow-Day-Shaker-Card-Idea

Christmas 2014 – Christmas Card Making – Lawn Fawn Snow Day Christmas Card Idea

This is a quick Christmas card I put together for my Japanese tutor. I used scraps left over from other Christmas cards from the Lawn Fawn Snow Day 6 x 6 Paper Pack.

Machiko_1

I layered the large brown rectangle at the bottom with the peacoat pattern paper rectangle on top bordering to the right-hand side and then on top of those I adhered the red coloured snowflake pattern paper at an angle.

From there I adhered the cute Christmas bunny pattern paper at an opposite angle. Then, I sliced the ‘for you’ tag, also a part of the Lawn Fawn Snow Day 6 x 6 paper pack. I punched a hole at the top using the Crop-a-dile Big Bite II and tied a bow using the Lawn Fawn Peppermint twine.

Machiko_2

To finish, I stamped ‘Merry’ and ‘Christmas’ using the Simon Says Stamp Happy Holidays stamp pack onto the red snowflake pattern paper and cut out triangles from the end to make a banner.

This card was quick and easy and I really liked the results. I would have liked to use white embossing powder to emboss the ‘Merry Christmas’ sentiment but I didn’t have a heat gun at this time so I had to work with what I had.

Christmas 2014 – Christmas Card Making – Lawn Fawn, Simon Says Stamp – Happy Holidays!

This card I originally made with the intention of giving it to my best friend, but I wasn’t wholly happy with the final result so I ended up making a different card to gift to her. This first photo is the rough assembly to see how everything looked together.

card_1_1

I had chose papers from the Lawn Fawn Snow Day 6 x 6 Paper Pack and stamped some Christmas trees using the Simon Says Stamp Be Joyful Stamp Set. The sentiment ‘Happy Holidays’ was also from the Simon Says Stamp Be Joyful Stamp Set. The cord is Lawn Fawn Peppermint Cord.

card_1_2

I used my Crop-a-dile Big Bite II to punch some holes either end of the cord to thread the Lawn Fawn Peppermint cord through.

Icard_1_3
I end up using the stamped trees as stencils, as I didn’t like the way the ink looked. I used the same red paper from the walrus Christmas scene card also from the Lawn Fawn Snow Day 6×6 Paper Pack.

I used foam squares to adhere the sentiment.

I tried to fill the blank space in the right-hand side corner with a bunny, but I still didn’t like the result. I ended up letting my partner give it to his Nan & Pop, so the card wasn’t wasted.

Christmas 2014 – Christmas Card Making – Simon Says Stamp Big Holiday Wishes

grandmachristmas

This is one of three cards I made with a friend at a card making get-together. I made this one for my grandma. I chose out the green mitten pattern card from the Lawn Fawn Snow Day 6 x 6 Paper Pack and a red pattern paper. I cut them to size not in equal halves and adhered them to the card base.

I stamped the sentiment ‘Sending Big Holiday Wishes’ from the Simon Says Stamp Big Holiday Wishes stamp set with green memento ink onto plain white card stock and I cut the card stock down to size. I positioned the sentiment on the card askew. I didn’t want the sentiment just by itself and if I pulled the sentiment to either side then the opposite side looked empty. So I adhered it to the left-hand side and then started on filling the right-hand side with embellishments.

I used the mitten stamps from the Simon Says Stamp Big Holiday Wishes stamp set with green memento ink to stamp the mittens and I cut them out with scissors. I then cut a small length of the Lawn Fawn Peppermint cord and adhered it to the mittens.I then positioned and adhered the mittens beside the sentiment.

I had left it like that for a while and it wasn’t until I was searching through my craft drawers at home that I found some old Christmas ribbon which I used to finish off the card and create a border between the green and red pattern paper on the card.

I think this card is fun and bold and really simple to make. I’m sure my grandma will love it.

I hope this card inspired you!

Christmas 2014 – Christmas Card Making – Lawn Fawn Snow Day

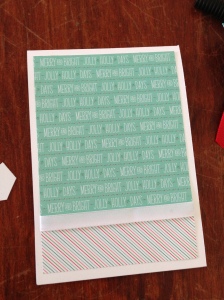
This card I was designing with my older brother in mind. I used the peacoat papers from the Lawn Fawn Snow Day Petite Paper Pack. On top of each other they looked okay but I added some white ribbon to give it a more elegant and finished look. The white ribbon I had left over from a bunch of scrapbooking supplies I received from my partner’s mother as a present.

2014-12-07T18-36-02_2

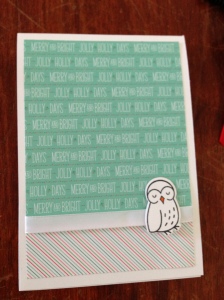
There was a bit of a dirty glue mark on the right hand side on the ribbon and I wanted to cover that up so I stamped the owl from the Lawn Fawn ‘Critters in the Arctic’ stamp pack and then used the coordinating die to cut it out. I coloured the owl’s beak in using a Memento ink pen. I was still undecided how I wanted to colour the rest of him and what colours I wanted to use.

2014-12-07T18-36-02_3

So I moved on to filling up some of the blank space. I tried a couple different things and after a few failed stamping attempts, I used the Simon Says Stamp Stencil Christmas Scene to stencil two Christmas trees, one big and one small, on the coordinating ‘Snow Boots’ paper from the same Lawn Fawn Snow Day Petite Paper Pack. I cut these out using scissors and loosely placed them beside the owl to see how they’d look.

At first I was going to cut a tag using Simon Says Stamp Tiny Tags Crafts Dies and have the tag hang there, but I couldn’t detach the tag I wanted to use from the other tags, so I scrapped that idea and tried something else.

Eventually I decided on using the ‘Happy Holidays’ sentiment from the Simon Says Stamp Be Joyful clear stamp set and I stamped it using black Memento ink onto just some plain white card stock. I trimmed the piece down with plenty of white space either side as I wanted to add some sparkle later.

I used my Crop-a-dile Big Bite II to punch two small holes at either end at the top of the white card stock. I then threaded some cord through the holes. It is the Lawn Fawn Peppermint cord. I glued (or attempted to glue) the cord at the back and then put some foam stickers on the back as well and adhered the card stock to the pattern paper.

I used some red rhinestones in different sizes in 3’s either side of the sentiment. I was happy with all of this so I moved onto finishing the owl.

2014-12-07T18-36-02_4

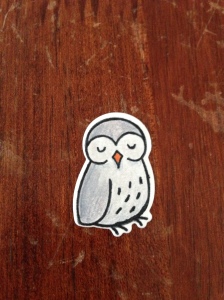
I used my Derwent Studio pencils to colour the owl. I used #70 French Grey to go over the whole white space first. Then on the wing and top of the head I used #69 Gunmetal Grey. My older brother is a bit of a gun nut so I thought it was a very appropriate colour to use. I added some slight shading using #68 Blue Grey. And then went over the whole lot again with #71 Silver Grey. The ink had faded a bit with my poor colouring technique so I went over it with a Memento black ink pen.

2014-12-07T18-36-02_5

I adhered the two trees side by side. I didn’t use foam I just wanted them flat. I think it would have been too much 3D effect if I had the trees popping as well as the tag and the owl. I only place one foam square behind the owls head to adhere it over the mark on the bow.

2014-12-07T18-36-02_6

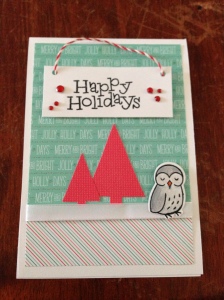
I’m really happy with the finished result. I think the owl represents my older brother Jakob. Sleepy and the holiday seasons bore him. Haha!